The Visual Art methodology is a structured, step-by-step process for creating artwork. It seamlessly incorporates and encompasses all the fundamental aspects of visual art, including creative abilities, medium expertise, tool proficiency, and subject knowledge.
Creating an artwork is a project and not a process. An art project can be defined as a sequential arrangement of tasks orchestrated to attain a unique and specific outcome every time. This involves thorough planning encompassing aspects like scope, timelines, cost, and resource management, followed by organization and diligent monitoring and control of elements such as risk, risk mitigation, progress, variances, corrections, and quality assurance at each step.
After 15 years of teaching visual art and engaging in extensive discussions with diverse renowned artists, each specializing in various artistic mediums, Shanky Studio has meticulously formulated a standardized methodology for the creation of artwork. This comprehensive approach not only synthesizes the invaluable insights of these artists but also incorporates years of research and experimentation, resulting in a method that fosters creativity and excellence in artistry.
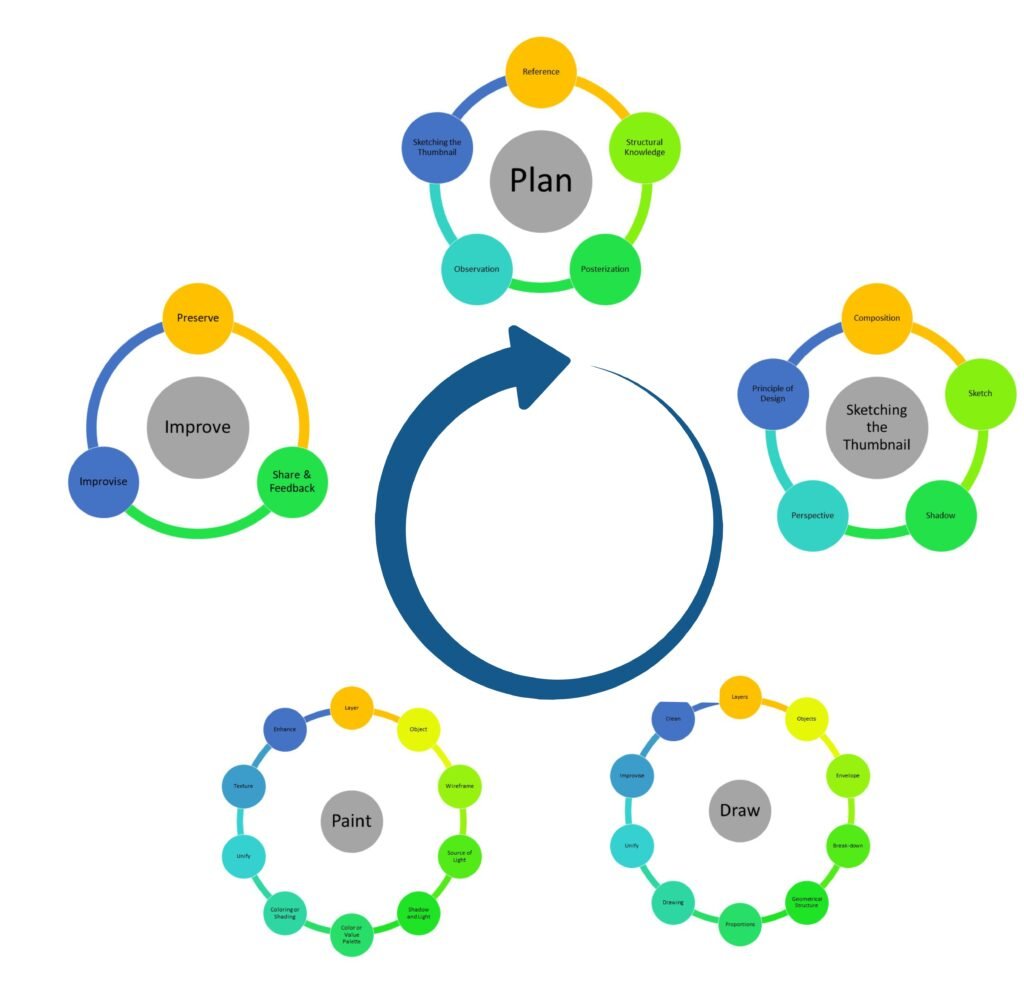
The following iterative process is divided into 4 parts viz Plan, Draw, Paint, and Improve. Depending on the chosen medium and subject matter, certain steps may become optional, redundant or may involve back-and-forth iterations with each other.
- Plan: Many beginners often commence painting without thorough analysis and planning, which may not be the best approach. Planning, on the other hand, mitigates risks and accidents while accelerating the achievement of desired results.
- Reference: Often, artists aim to reproduce artwork from various sources, including live environments, reference pictures, memory, and imagination. The latter two can be particularly challenging and need lots of practice using multiple methodologies. For beginners, it’s beneficial to use posterized pictures, both black & white, and colored reference pictures.
- Structural Knowledge: It’s essential to possess an understanding of anatomy or structural knowledge, as well as standard proportions of the objects you’re portraying in your artwork. This knowledge enhances your ability to represent the object accurately and realistically without any struggle.
- Posterization: Posterization is a technique employed to simplify an image’s complexity by reducing the number of tones, whether in terms of values or colors, to a limited range typically ranging from 2 to 10 levels. This process serves the purpose of enhancing our ability to comprehend and analyze the subtle variations in both value and color gradation within the image, whether transitioning from darkness to light or vice versa. Posterization simplifies tones to highlight critical elements and enhance contrast, making the image easier to analyze and interpret from the anatomy or structure’s perspective.
- Observation: For an artist to authentically connect with their subject, immersing oneself in the environment becomes paramount. This immersive experience, coupled with a mastery of the fundamental principles of art, allows for a profound observation of the subject or scene, even when referencing pictures. Through this acute awareness, artists can skillfully craft their narrative by delicately balancing the inclusion and exclusion of details. By discerningly omitting extraneous elements and strategically incorporating aesthetically pleasing artistic elements, they breathe life into their work. This process of selective observation and creative expression transforms a mere rendering into a powerful conduit of artistic expression, inviting viewers into a world that resonates with both visual allure and emotive depth.
- Sketching the Thumbnail: The essence of sketching lies in the seamless transition from ideation to visualization. It involves the swift creation of a rough, conceptual, and iterative thumbnail. This initial step not only helps bring your ideas to life but also allows you to refine and evolve them iteratively, giving form to your creative vision. Sketching the thumbnail involves the following steps –
- Composition: Begin by making a deliberate choice regarding the orientation of your intended artwork, whether it’s a square format, portrait, or landscape. This initial decision sets the stage for your composition’s visual impact. Next, strategically arrange the various objects and carefully compose the scene in adherence to established composition rules. By following these principles, such as the rule of thirds, leading lines, and balance, you ensure that your artwork not only captures the viewer’s attention but also conveys your artistic message with clarity and aesthetic appeal. Crafting your composition with these considerations in mind lays a strong foundation for the artistic journey ahead.
- Sketch: Creating a rough and quick drawing involves the use of basic shapes such as lines, circles, squares, triangles, and more. These foundational elements serve as the building blocks for the initial composition. By skillfully combining and manipulating these simple forms, artists can swiftly convey their ideas, establish the overall structure, and lay the groundwork for a more detailed and refined piece of artwork. This preliminary stage is a crucial step in the creative process, enabling artists to capture their initial vision before delving into more intricate and nuanced artistic elements.
- Shadows: Start by identifying the darkest areas in your subject, those with the most shadow and contrast. Then, carefully shade these areas using various techniques to convey depth and realism, captivating your viewer’s gaze.
- Perspective: Take a moment to locate and incorporate essential perspective elements into your composition. Ensure you include a horizon line, which serves as a crucial reference point. Additionally, consider incorporating perspective lines, such as converging lines for different planes within your artwork. These elements are fundamental in guiding the viewer’s eye and creating a sense of depth and realism in your artwork.
- Principle of Design: By carefully integrating the design principles, you have the opportunity to not only enhance the visual appeal but also strengthen the core message and focus of your artistic expression. This deliberate approach empowers artists to create works that resonate more deeply with viewers, conveying their intended meaning with greater clarity and emotional resonance.
- Improvise: Engaging in a what-if analysis and embracing an iterative approach can be pivotal in refining your thumbnail sketch to achieve continuous improvement. By subjecting your initial concept to a series of ‘what-if’ scenarios, you gain the ability to explore various creative possibilities and refine your vision. This iterative process allows you to fine-tune the sketch with each iteration, leading to a more polished and compelling final result. It’s a dynamic strategy that empowers artists to push their creative boundaries and uncover unexpected avenues for improvement in their artwork.
- Draw:
- Layers: Begin by dissecting the reference picture into distinct layers, differentiating between the foreground layer and the receding layers. This includes identifying and categorizing elements on each layer such as human figures, vehicles, trees, buildings, flying birds, clouds, and the expanse of the sky. By deconstructing the image in this manner, you’ll gain a comprehensive understanding of its composition, allowing for a more precise and informed approach to your artwork.
- Object: Before embarking on the drawing of an object or a specific section of an object within a layer, it is imperative to meticulously identify and isolate the particular object within that layer. This method serves as a cornerstone for achieving clarity and facilitating comprehension during the entirety of the creative process.
- Envelope: Define the dimensions, both height, and width, of the identified object within the envelope. This step enables precise sizing and proper placement of the object in the desired location within the drawing area.
- Break-down: Break down the object by employing a combination of horizontal, vertical, and diagonal lines, as well as basic shapes such as circles, rhombuses, triangles, and other recognizable simple geometric forms. This deconstruction process enhances your understanding of the object’s structure and aids in its accurate representation.
- Geometrical Structure: Refine and transform the envelope into a geometric structure, which will serve as the foundational blueprint for your final drawing.
- Proportions: Ensure that the object adheres to its standard proportions and maintains accurate relative proportions when compared to other objects within the composition. This meticulous attention to proportionality contributes to the overall harmony and realism of the artwork.
- Drawing: Refine the geometry of the object, transforming sharp corners into gentle curves, to create the final drawing that captures the object’s silhouette with precision and finesse.
- Unify: Up to this point, we’ve been working with the smaller portions of an object, and now it’s time to unify them into a single, cohesive whole. Refining the drawing involves consolidating and harmonizing these smaller, fragmented sections into cohesive and logically connected units, resulting in a complete and unified representation of the object.
- Improvise: Conduct precise measurements and perform a thorough cross-check of the drawing, meticulously scrutinizing every element and aspect. During this examination, pay close attention to identifying areas that may benefit from enhancement, adjustment, or refinement. By undertaking this comprehensive assessment and effecting necessary improvements, you ensure that the final artwork aligns with your artistic vision and maintains the highest quality standards.
- Clean: In the final stages, meticulously remove the structural guidelines that laid the foundation for your drawing. Gradually diminish the intensity of the drawn lines with an eraser, achieving the desired level of clarity and finesse. This meticulous process transforms your initial sketch into a clean and refined drawing, primed for rendering. Keep in mind that the line drawing acts as a container for the shading or paint, which is the next crucial step in the process.
- Paint:
- Layers: Select a layer.
- Object: Identify the object in a selected layer.
- Wireframe: In the wireframing process, visualize or create a 3D wireframe that clearly depicts anatomy, structure, contours, and cross contours. Here, the goal is to discern the planes and their corresponding angles using forms, which can vary from basic 3D forms like spheres, cuboids, cylinders, and cones to more intricate hybrid structures. By meticulously identifying and outlining these planes and angles, you not only establish the foundation for your design but also gain insight into how light and shadow will interact with your object.
- Source of Light: After creating the 3D structure, the next step is to identify the source or sources of light and its attributes that will illuminate your planes. Comprehending the direction, luminosity, temperature, and nature of the light source is paramount, as it profoundly influences the way shadows and highlights will interact with your object, imbuing your visual narrative with depth and realism.
- Shadow & Light: After identifying the source of light, proceed to distinguish the various areas in an object, based on their luminosity. Categorize these areas into the bright, less bright, dark, and very dark regions. This differentiation is essential for effectively conveying depth, contrast, and mood in your artwork.
- Color or Value Palette: Generate a color or value palette that aligns with the posterization process. This palette serves as a tool for artists to systematically organize and utilize the limited range of tones established through posterization. By creating this palette, artists can more effectively control the distribution of light and shadow within their artwork, allowing for deliberate and impactful visual storytelling while maintaining a cohesive aesthetic.
- Coloring or Shading: Utilize the color or value palette as you embark on the shading process, tackling each section of your artwork methodically. Depending on the chosen medium, shading can be executed through a gradual transition from dark to light or from light to dark. This technique allows for the careful manipulation of contrast, depth, and form, enhancing the visual impact of your composition. By effectively applying coloring or shading techniques in accordance with your medium, you breathe life into your artwork, imbuing it with dimension and conveying your artistic vision with precision.
- Unify: Enhance the drawing by bringing together and harmonizing the smaller, fragmented sections into coherent and logically connected units.
- Texture: In the final layer, it’s time to introduce texture, altering the object’s surface quality to add depth, realism, and tactile appeal to your artwork. This step involves the meticulous application of various techniques and details, allowing you to capture the essence of the object’s texture, whether it’s smooth, rough, or anything in between. By skillfully incorporating texture, you infuse your creation with an added layer of visual and sensory richness, elevating your artwork to a new level of depth and engagement.
- Enhance: As you near the final stages of your drawing, shift your attention towards the critical task of applying finishing touches that refine the fine details, edges, contrast, highlights, and other subtle nuances. This stage represents a meticulous process wherein every aspect of your artwork is enhanced with care and precision, ensuring it attains the desired level of visual impact and overall excellence.
- Improve:
- Preserve: After completing your artwork, and once it has fully dried, it’s crucial to take measures for its long-term preservation and enjoyment. Utilizing varnish and appropriate framing techniques can help safeguard your artwork, ensuring its durability and continued appreciation.
- Share & Take Feedback: The subsequent phase involves sharing your artwork with an audience and actively seeking critical feedback. This invaluable input serves as a constructive mirror, reflecting areas that may benefit from improvement and offering opportunities to refine our skills. By welcoming this feedback, we embark on a journey of continuous growth and enhancement in our artistic endeavors.
- Improvise: By actively seeking and wholeheartedly embracing constructive feedback on our current artwork, we not only enhance the quality of the present piece but also lay a solid foundation for improvement in our future creations. This open and receptive approach to feedback serves as a catalyst for artistic growth, enabling us to evolve, refine our techniques, and consistently elevate our work to new heights.
Do’s and don’ts while following the methodology –
- Begin your artwork with an external, macro perspective, gradually delving into internal and micro details, establishing a strong foundation. As you strengthen this framework, progress inward, shifting from simple to complex, shaping every detail for a comprehensive and harmonious artwork. This process mirrors the shift from external to internal, macro to micro, and light to dark lines, starting from the front layer and moving into receding layers. In a nutshell, start from –
- External to internal
- Macro to micro
- Simple to complex
- Light lines to dark lines
- Front layer to the receding layers
- Drawing is an iterative process, where each iteration provides an opportunity for continuous improvement and improvisation in the artwork. In this iterative process, avoid using an eraser, as incorrect lines become the guidelines for future accurate lines.
- Sketch, draw, and paint from the shoulder with an overhead pencil grip, utilizing the pencil lead’s angle, while avoiding the lead’s tip.
- Ensure that your drawing is executed with a delicate touch and a light pencil. A 2D line drawing serves as the initial framework, acting as a container for the subsequent 3D shading to bring your artwork to life. In certain art forms and mediums, lines play a central role, allowing you to use a firmer hand to create bold and prominent lines.
- Be mindful to avoid direct contact between your skin and the paper to prevent the transfer of skin oils, which can potentially lead to shading issues in your artwork.
- Utilizing different brushes for various areas in your artwork allows you to achieve diverse textures, maintain precise control over paint application, and create distinct visual effects. Begin by using larger brushes for broader strokes and gradually switch to smaller brushes for intricate details in your artwork. This approach provides a balanced technique for achieving both the grander aspects and finer nuances in your creation.
- While on this creative journey, immerse yourself fully in the process, relishing every moment, and relinquishing excessive concern for the final outcome and timelines. Allow your awareness to transcend to a higher level, one that exists beyond the constraints of space and time.

